How to make GIF stamps using Ezgif
Added: 06-05-2026
A quick guide on making animated GIF stamps using the website Ezgif.com. There's already quite a number of articles like this out there but I figured I'd make one for my own reference.
1. Preparing the GIF and stamp frame
Decide what GIF you will be using for this stamp first.
If you plan on making one from a video, Ezgif also offers a mp4 to GIF function:
1. Click on "Video to GIF"
2. Click on "Upload video"
3. Click on Convert to GIF!
Here I usually change the default frame rate from 10 FPS to 12 FPS, but you can do whatever you prefer :P.

We'll be using a GIF of the song
ドリーム・キス by Toiki. for this guide.
Most stamp frames usually come in the dimensions
±99x57, like this:

2. Resizing the GIF
Once we have our GIF, click
Resize image!to resize the GIF so it fits the dimensions inside the frame.
For this frame, the dimensions needed are
94x50.
There should be a dropdown menu on the bottom right with the following options:
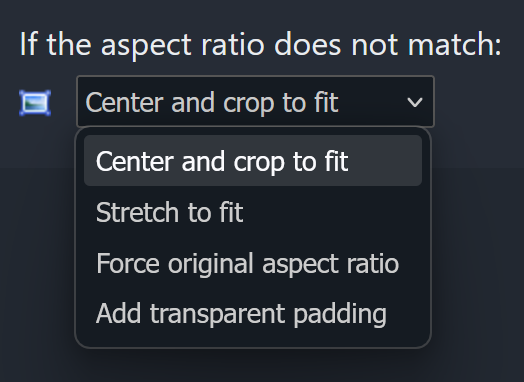
Select either "
Center and crop to fit" or "
Stretch to fit" depending on which one looks better. The other two options will change the dimensions and the GIF will no longer fit inside the frame, which we don't want.
3. Overlaying the frame
Now that our GIF has been resized to 94x50, click "
Save" at the end of the row of icons.
Then, click "Effects" and find "Overlay" under the topmost navigation bar on the screen. Upload the resized GIF here.
Immediately after uploading the GIF, click the thin blue button below it that says:
Extend canvas size (use if overlay exceeds the base image size)
This will add transparent padding around the GIF so that we can reposition the frame onto it. Next, upload the frame.
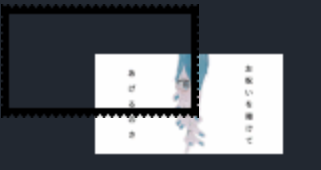
Now we have to adjust the overlay position so the GIF fits inside the frame. For this template, set the overlay position on the left to
44, and the top to
22, and the overlay width to
99 and height to
57.
The stamp should turn out like this:

Finally, crop away the transparent section. Click on "Crop".
You should see 4 input boxes in the order
Left, Top, Width, and
Height.
Enter the values in the exact same order as the previous step (
44/
22/
99/
57), and click
Crop image!
The final stamp:

That's it!

Welcome!
Added: 06-05-2026
This is just a test page for diary entries.
Regular/personal diary entries will be marked with a blue star( ) and tutorials will be marked with a yellow star(
 ).
).
Thanks for reading!